
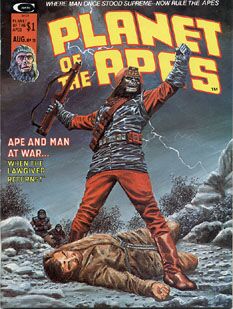
In July of 2000, POLAR LIGHTS' reengineered the old ADDAR 'Planet of the Apes' kits. First to hit the shelves were GENERAL URSUS and CORNELIUS, with DR. ZIRA and DR. ZAIUS due out in the Fall.The Apes are my favorite, so I snatched Ursus up quickly!
So let's open the box and get started...
Preliminary Build-Up
I want to see if I can reposition the arms more like the picture above shows. (Maybe some day in the future I'll see if I can sculpt
a human female laying at his feet!) ![]()
Being a Snap-Together, the halves don't close together tightly enough for me, so I cut the tabs off and use standard liquid glue.
For the first time I'm trying out AMBROID's Pro-Weld to see how this brand is.
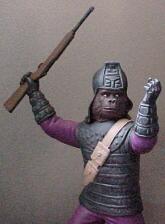
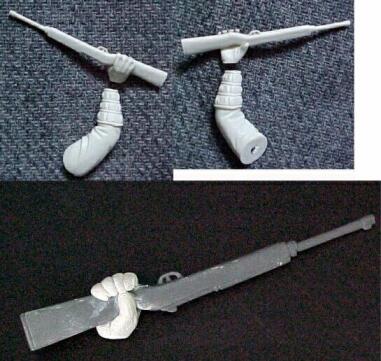 The first alteration I make is to
cut off the right hand at the wrist. I didn't like the angle of this hand, and I also want to shift the rifle to that side.
The first alteration I make is to
cut off the right hand at the wrist. I didn't like the angle of this hand, and I also want to shift the rifle to that side.
Not owning a heat gun, I test fit the rifle in the right hand, and then CAREFULLY using a lighter, try to move the fingers around the rifle butt more.
Days later, I just wasn't satisfied with the lack of grip on the rifle. Had just ordered my first box of Milliput, so opened the box, mixed two small batches together and made a better hand.
Glue the torso halves together and sand the seams. You'll notice that his left foot needs toes, so using a rounded needle file, sand down an indentation to make his feet match.
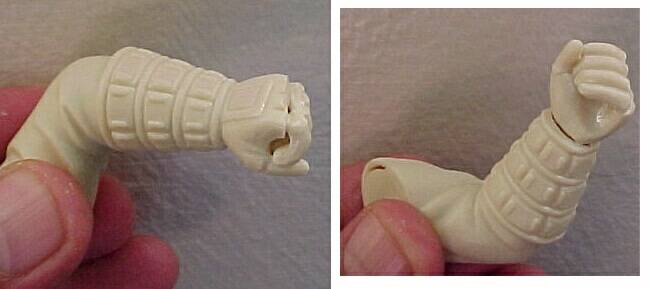 Next step is a little hairy, so if
you decide to do this take it slow. I wanted his left hand in a fist. So using your crimpers, cut off the fingers at the main knuckles,
and the thumb around the middle knuckle. Then reposition the fingers and thumb and glue them down.
Next step is a little hairy, so if
you decide to do this take it slow. I wanted his left hand in a fist. So using your crimpers, cut off the fingers at the main knuckles,
and the thumb around the middle knuckle. Then reposition the fingers and thumb and glue them down.
There'll be a gap at the hand knuckles that will need to be filled with putty. I used Testor's Contour putty.
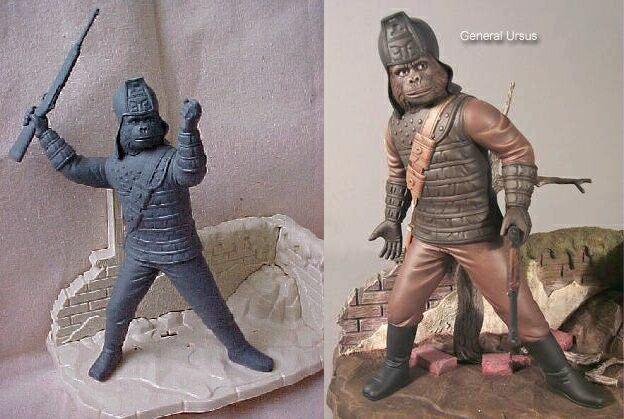
I cut off the tabs for the arms, as well as the tab for the head and glue everything together. I start with the head and position this correctly, then the right & left arms, making sure the position of his arm doesn't hide his face.
Here's a look at both the 'Out of the Box' version, next to the alterations I made...dang!! I like it!!
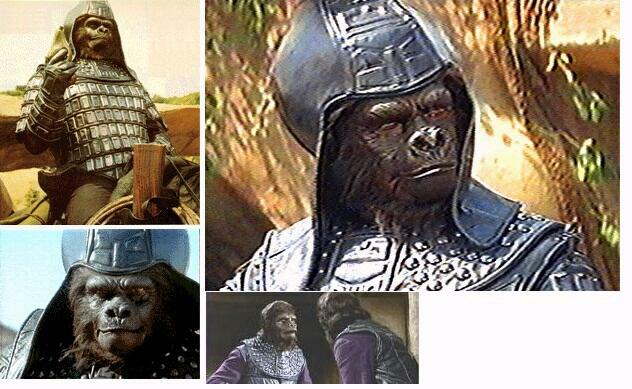 First thing to do is hunt around the
Internet for good General Ursus photo's.
First thing to do is hunt around the
Internet for good General Ursus photo's.
Not too many around but I looked at anything featuring the apes to get some idea of their uniforms. Although the box art
shows a yellow color, didn't find that to be true. I do like the purple color and will use that for the sleeves and legs.
As usual, start out spraying the figure with KRYLON's Sandable Primer.
 Paint the boots, gloves & vest using
Palmer Prism Raven Black...the sleeves and pants with Anita's Violet Purple.
Paint the boots, gloves & vest using
Palmer Prism Raven Black...the sleeves and pants with Anita's Violet Purple.
Once dry...spray a nice coat using KRYLON's Matte Finish.
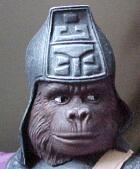 The face is painted with Burnt Umber, with a Black wash. White to
the eyes, and used a Fine Point Black Pen to put in the pupils.
The face is painted with Burnt Umber, with a Black wash. White to
the eyes, and used a Fine Point Black Pen to put in the pupils.
 Next I take some of Anita's Barely Blue and drybrush over
the black vest, highlighting the circles and details to bring it out some.
Lighten down the Violet and do the same for the pants & sleeves.
Next I take some of Anita's Barely Blue and drybrush over
the black vest, highlighting the circles and details to bring it out some.
Lighten down the Violet and do the same for the pants & sleeves.
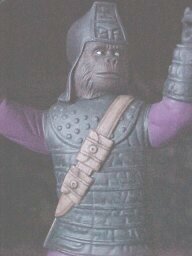 Paint the ammo belt with Delta Ceramcoat Light Chocolate Brown, seal, then add a wash of Expresso Bean Brown!
Confession time! I had taken the loose bricks and stick pieces, as well as his side knife out of the box and "put them in a safe place" so I wouldn't lose them!
As soon as I 'remember' where that safe place is, I'll paint up and attach his knife to the belt!
Update 11/19/00: Screw it! Went out and bought another Ursus!! Now watch those lost pieces 'suddenly'
show up!!
Using Testor's Contour putty, fill in the gaps between the base of the wall and the ground, on both sides.
Hit it with KRYLON's Sandable gray primer and let dry. Using KRYLON's Flat White, apply an even coat over the entire base. (This gives you a nice light color to begin painting the various base items).
 Paint the stones Raven
Black, the dirt Brown Oxide (2 coats to nicely cover the white base color). Raspberry Red lighted down with White
for the bricks and Leaf Green for the grass on top of the wall.
Paint the stones Raven
Black, the dirt Brown Oxide (2 coats to nicely cover the white base color). Raspberry Red lighted down with White
for the bricks and Leaf Green for the grass on top of the wall.
This gives us a nice base color to start drybrushing with. Hit it with KRYLON's Matte Finish first & let dry.
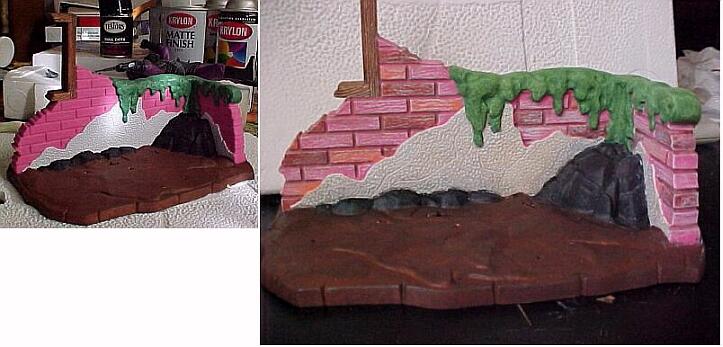 On the drybrushing stage,
starting with the brick wall. I first mix up a small batch of red/orange with a touch of black and paint
a few bricks here and there. Using an Orange Prismacolor pencil, color in a few more bricks here and there.
On the drybrushing stage,
starting with the brick wall. I first mix up a small batch of red/orange with a touch of black and paint
a few bricks here and there. Using an Orange Prismacolor pencil, color in a few more bricks here and there.
Diluting Anita's Espresso Bean Brown down to a nice wash, apply it to the lines inbetween the bricks, and then once that is dry, dilute it more and give the brick wall an overall wash to dirty up the bricks some.
For the moss on top of the wall, drybrush using Anita's Green Apple.
For the dirt floor, take some darker Burnt Sienna and paint it randomly over the slightly lighter Brown Oxide. Drybrush the rocks with White, and then after a coat of Matte Finish, with Brown Oxide.
Once dry, apply a brown wash to the moss on the brick wall to dirty that up some as well.
The large tree is primed with KRYLON's Sandable Primer, sealed and drybrushed using Light Chocolate Brown.
For now the base is done. Will not place the bricks and twig pieces on the base until I see if I can pull off putting a figure laying on the ground.
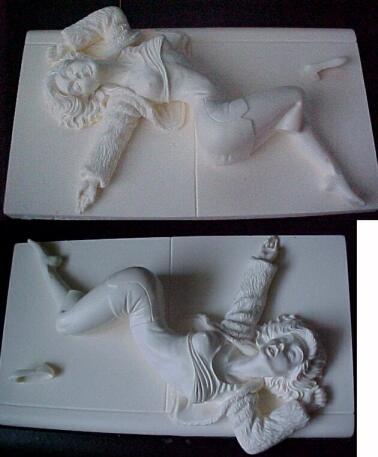 Purchased this resin kit at the last
CHILLER. Features a female Vampire standing over this dead woman.
Purchased this resin kit at the last
CHILLER. Features a female Vampire standing over this dead woman.
She's too big to use with Ursus, but does give me a 3D object in which to try and sculpt my own female to go with this kit.
Will let you know how it turns out!
This was a nice easy kit to put together and paint up. The Base provides plenty of dry-brushing and wash practice, especially on the brick wall.
I'll be purchasing another Ursus kit and see if I can alter his mouth somewhat. I'd like to see him giving out a triumphant victory roar as he stands over his latest kill!
Happy Modeling! - Buc (Sept - Nov 00')
Ursus Photo's | Work Bench